
This tutorial assumes you either know how to navigate E-Sys, and are willing to update the car to a recent I-Level, or have had the car updated at a dealer, I will show how to do it, but i do not take any responsibility for bricked ECU's.
THIS TUTORIAL IS AIMED AT LCI1 (First Facelift) F SERIES MINI'S and should work on all F chassis cars that do not have the "Radio Boost" (Radio only) or "Visual Boost" Headunit (Display and Headunit are one piece, does not have Nav, also known as the BIS headunit)
This is the "fun" part, Officially, the 6.5in display is no longer made, as from the LCI2 facelift, all MINI's got the 8.8in screen as standard, but for the LCI1 Facelift, the Radio options are as follows:
So, if your MINI headunit has 6/7 options (Carplay shows as an option on the main menu when connected to a supported iPhone), similar to the below:

If your headunit has a layout close to either of these with 6/7 Options: Mini Connected, My Mini, Navigation, Carplay (if car was specced with Carplay and iPhone is connected), Notifications, Communication, Media/Radio, You will be able to do this.
There's three ways you can do this check:
If your Current I-Level is over 21-03, then you can skip Step 2 and proceed to Step 3, Bimmercode
The information here is not final, i recommend not following this until the WIP is removed from the title
As a reminder, this only applies to the IDrive 5 headunits found in the LCI1 cars (Build Dates 03-2018 to 02-2021, US Model Years: 2019-2021)
E-Sys is..... terrifying if you've never used software of this caliber before, i *highly* reccomend watching through BimDoc's E-Sys for Dummies series on Youtube before attempting this, as i will not be explaining how to use the software outside of the scope of Updating the ECU's.
i will also not be providing links to any of the software and databases required for this job, google is your friend.
Now, we need to open up E-Sys, upon opening it will look something like the below, to note, i am using E-Sys 3.30 for demonstration purposes for these screenshots:
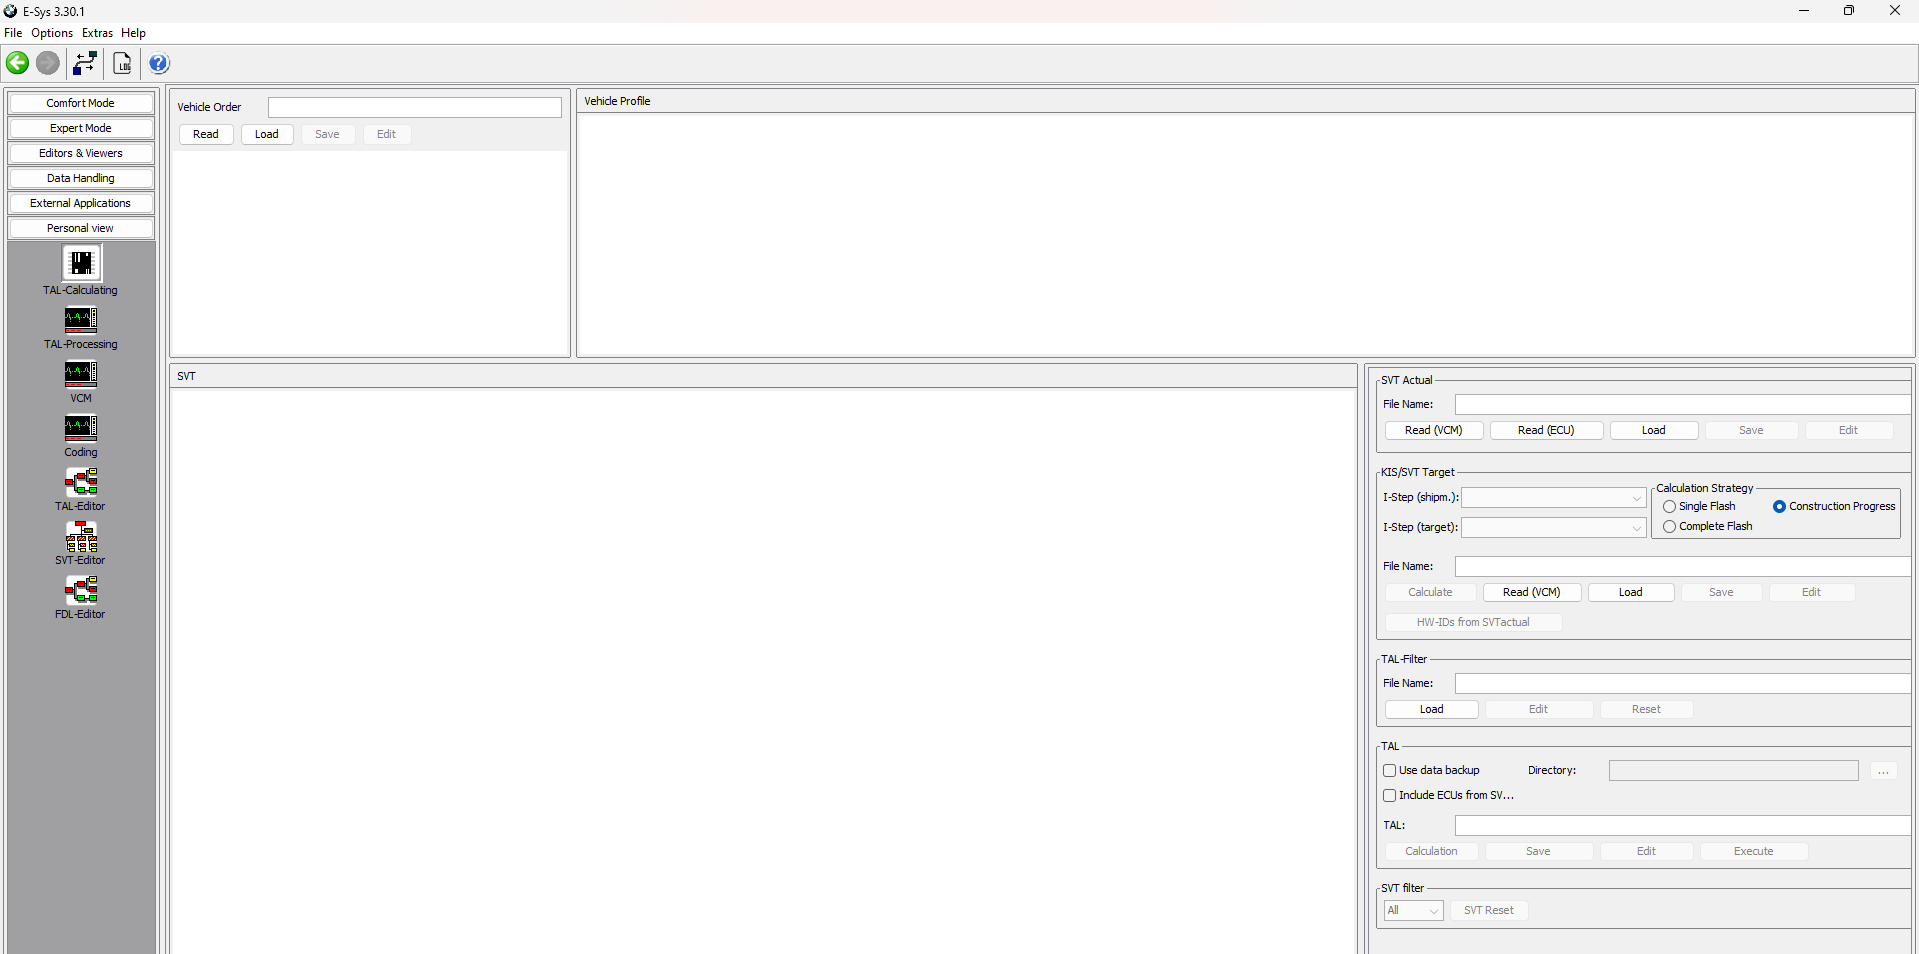
To connect to the car, we need to establish a connection, to do this, we hit the "Connect" Button as shown here:

this will then open up this dialog box below:
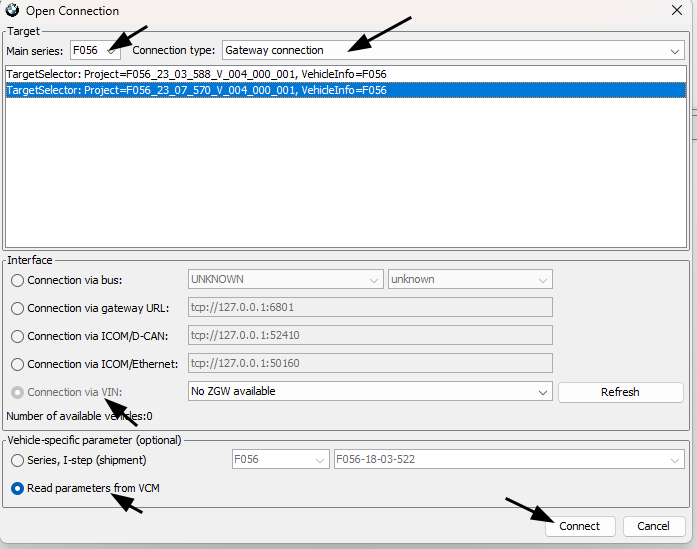
the filters at the top allow us to specify what we want, in this case F056 (which covers the F39/F45/F46/F47/F48/F52/F54/F55/F56/F57/F60, the number used in Esys is the overall platform number, so all the Mini's, and some of the BMW's that are also based on this platform use this option), and to only show Gateway connections.
Select the latest available iStep that your PSdZData has, then make sure the "Connection Via VIN" interface is selected, and "Read parameters from VCM" is also selected, then press connect, the image here shows "No ZGW Available" as these were taken without a connection to the car, but the dropdown box will show the IP Address of the Gateway and your car's VIN here when it is able to establish a connection with the car.
The next box to come up is E-Sys asking you to confirm that it read the Shipment I-Level from the VCM correct, if everything looks correct, continue, and after a few more seconds, you will now have connected E-Sys with the car.
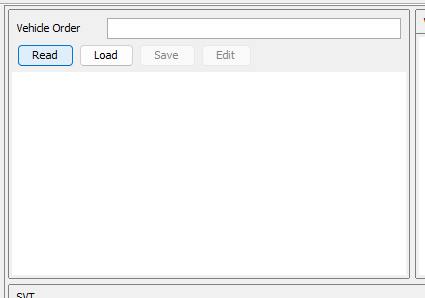
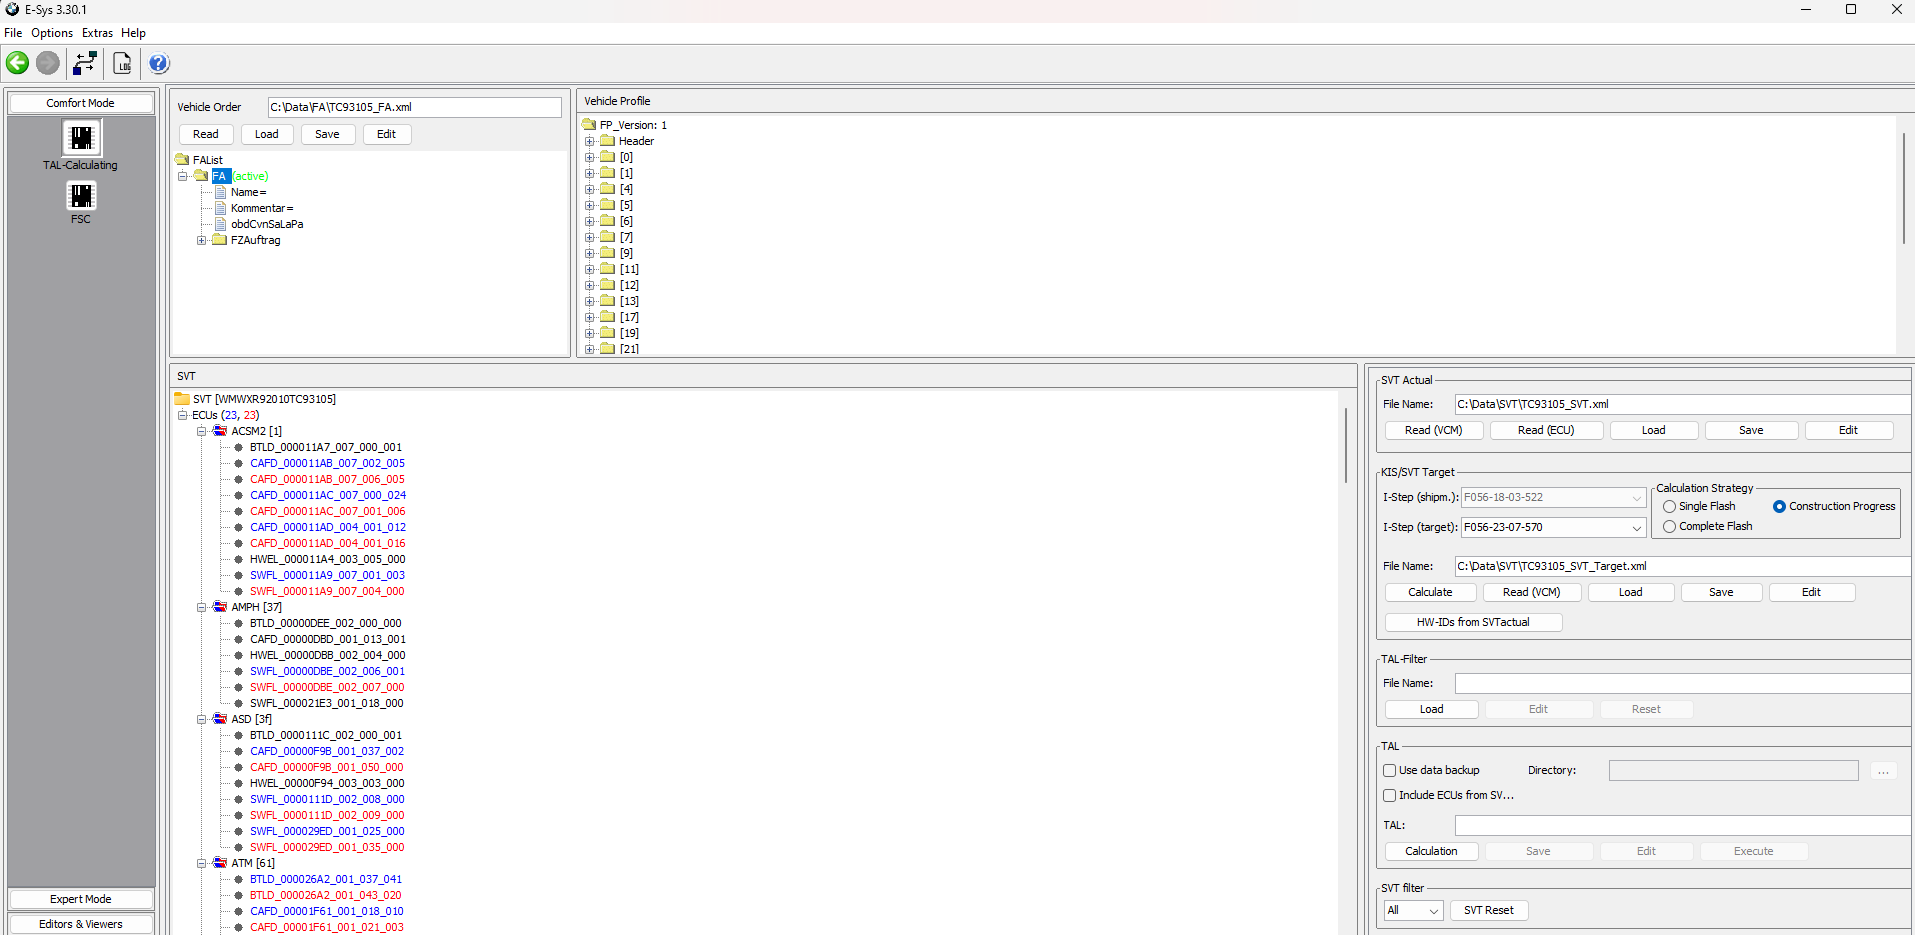
Next we want to go into comfort mode, and go into TAL Calculating, then we want to read our Vehicle order by clicking read button, as below, i also recommend saving this as $SHORTVIN_FA ($SHORTVIN being the last 7 characters of the VIN) as it makes finding it easier.
NOTE: Some versions of E-Sys do not automatically activate the FA, to do so, right click on the folder called FA and press Activate FA
then, in the area on the right, called "SVT Actual" click on Read (ECU), and then save this file as $SHORTVIN_SVT_ist (ist being german for "is", in this context, it means the Current SVT)
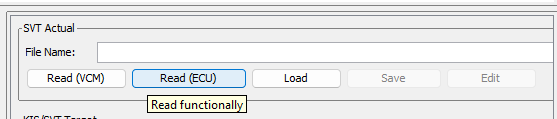
Below the SVT Actual section, is the KIS/SVT Target section, where we setup what we want our SVT should be:
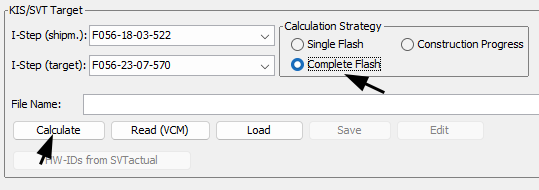
First we want to select Complete Flash, this will generate an SVT that will contain /all/ the new versions for all of the ECU's in the car, in the IStep (shipm.) sections, this will be set automatically by E-Sys to the Shipment ILevel of the car, in I-Step (target), we want to choose the lastest I-Level we have available in our PSdZData (in my case, 23-07-570), then we hit calculate, this might take a minute to do, after that we can save this file as $SHORTVIN_SVT_soll (i believe soll is being used here as "this is what the SVT should be")
what we will be left with is our TAL Calculating looking something like this (the vin shown here is of a car owned by the family), the ECU's shown will be different or could be the same depending on the Spec of your car.
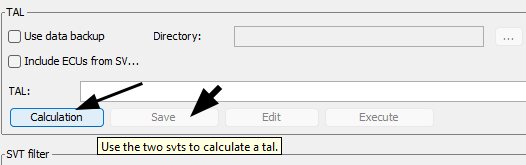
The last thing we need to do is to Generate the Transaction List (TAL), in the TAL Section near the bottom, we want to hit Calculate, which can take a while, and then after it has calculated hit save, and save the TAL as $SHORTVIN_SVT_tal.
With everything saved and ready, to perform the Update, we now need to go to Expert Mode -> TAL Processing. In the top box, load the TAL, SVT_soll, and press Read FA for the FA, you will then see the ECU section below that become populated with a bunch of options, all checked, press the first option under the "All" tab to uncheck all of them, this is done so that if you were to accidentally press start, nothing would happen as no ECU's are staged to be flashed.
Now press "Check Software Availability", what this does is confirm all of the Software Files are present in the PSdZData you downloaded, once the check is complete, it will say "All Software Units (SWE) are available." in a popup box, if it does not, then you have downloaded a LITE variant of the PSdZData you sourced and not the FULL PSdZData, you will need to download and replace the current PSdZData with the FULL PSdZData.
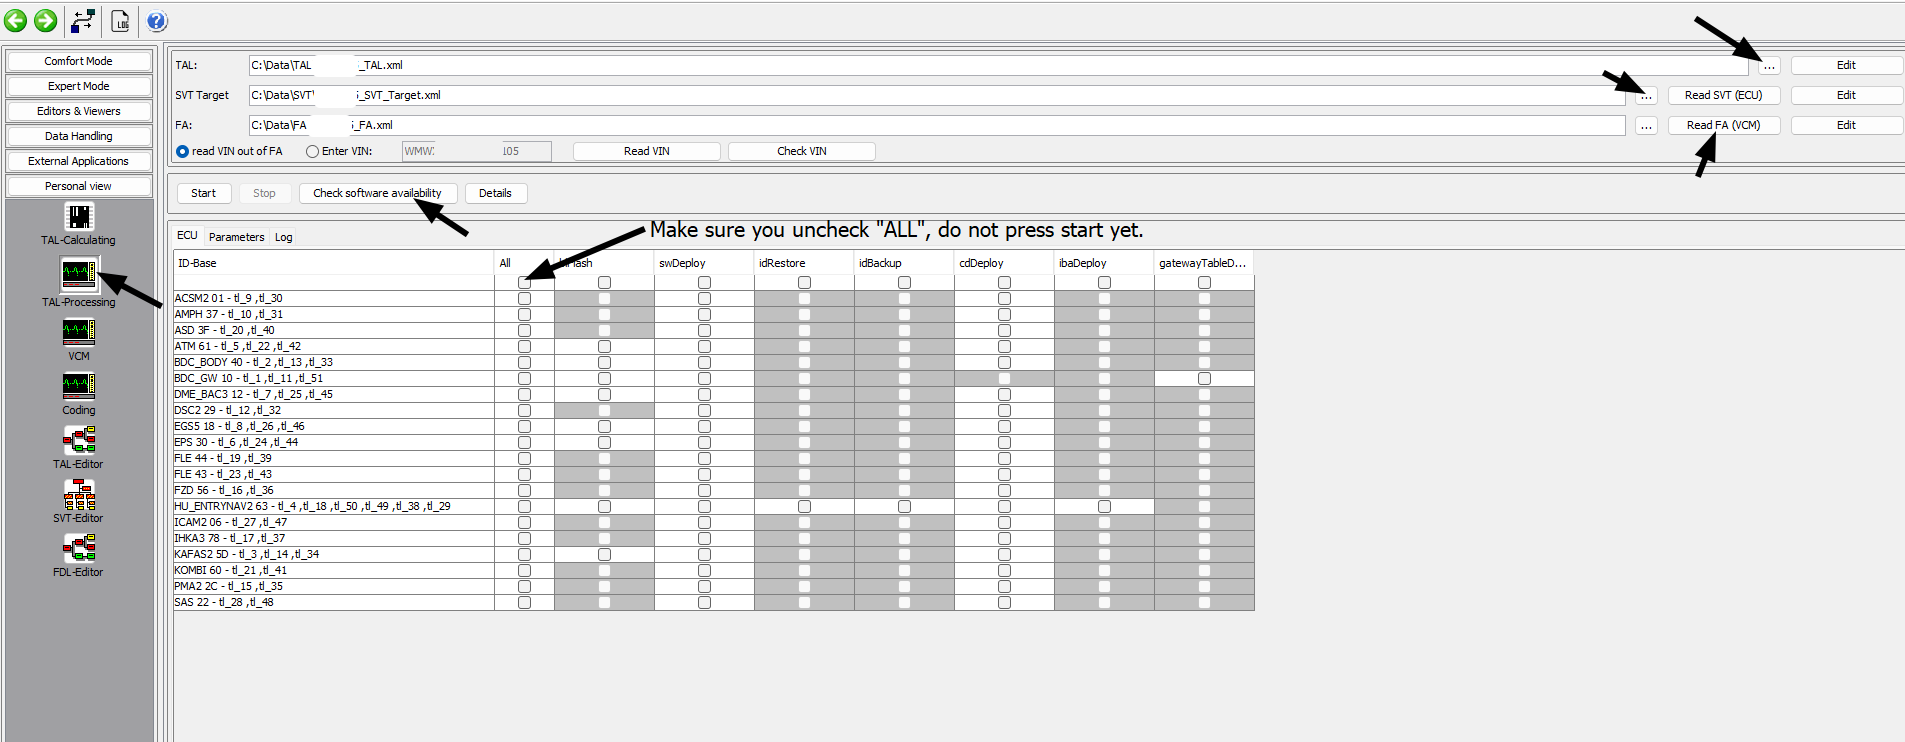
The next crucial step is to check for Dependencies, for this job, we will be updating the KOMBI, HU_ENTRYNAV2, and BDC_GW. Why the KOMBI as well? mainly due to it being configurable through the headunit, and a I-Level mismatch here could cause it not to be able to read data from the Headunit and viseversa, this is why we check for dependencies, so to do this, click the "Edit" button for the TAL, which will bring up the below editor:
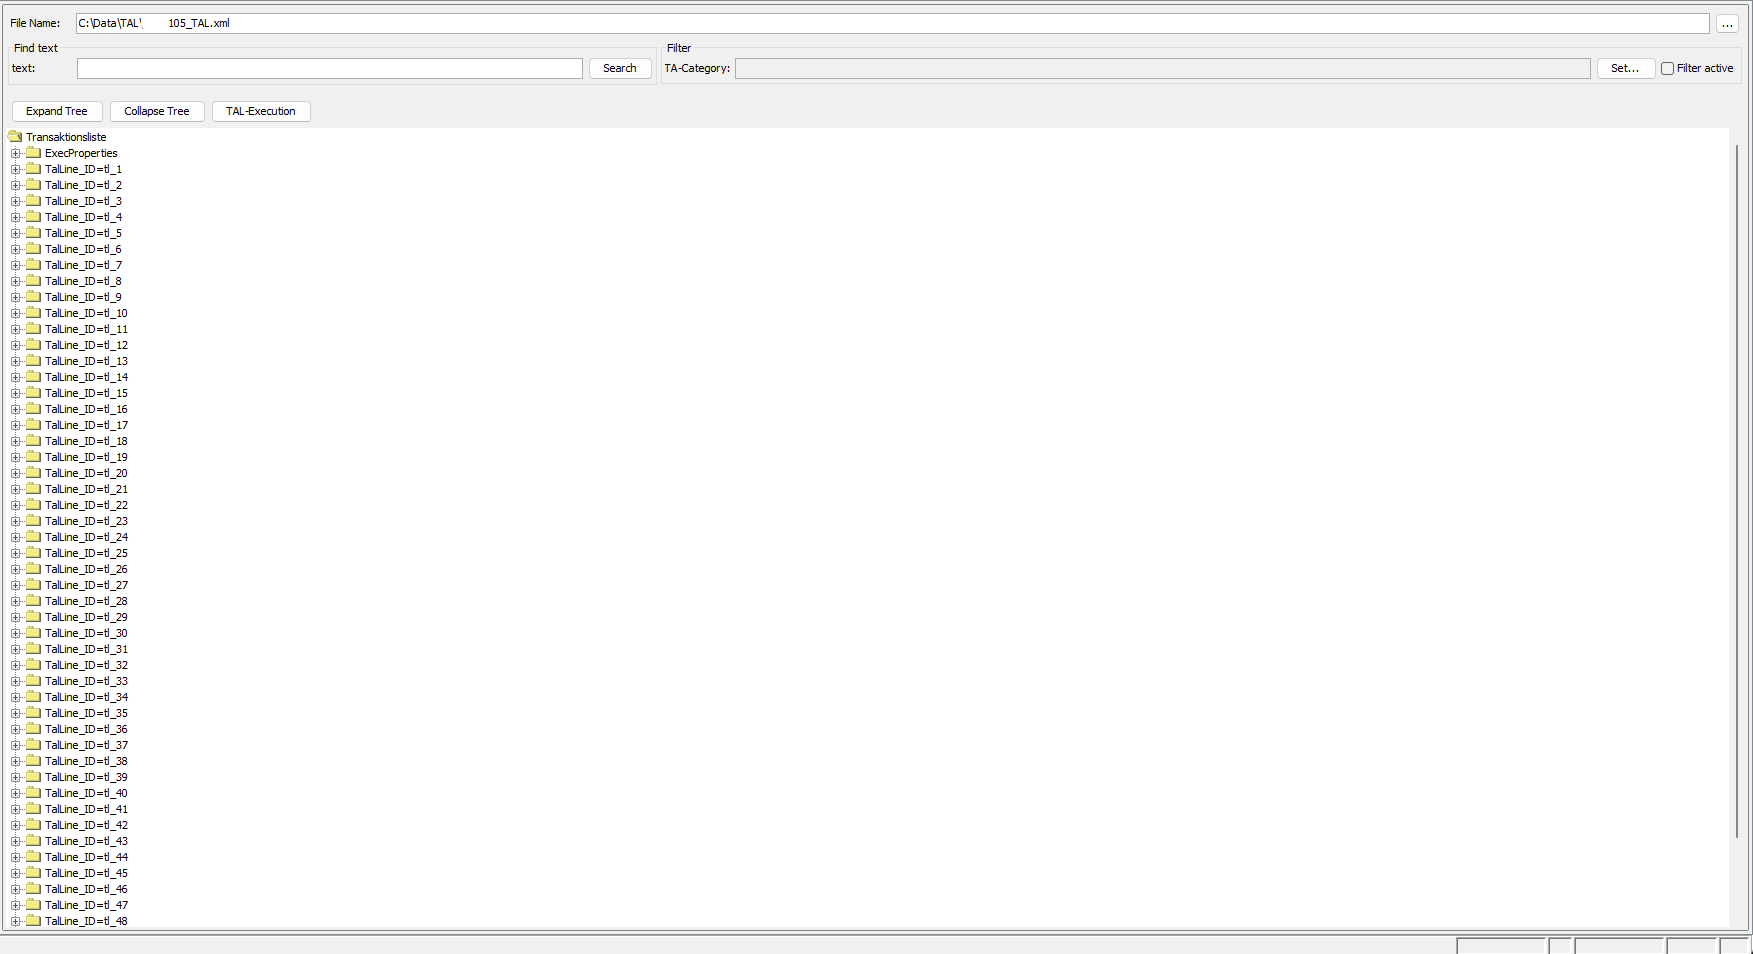
now, to check dependencies, in the Search box, Search for each of the ECU's we want to update (they will show up multiple times, check them all), and check their PreRequisite folder for any TalLine ID's, these ID's are the ECU's that are its Dependencies and must be updated as well.


as a guide, the KOMBI Depends on tl_1, tl_4, tl_11, and tl_38 (BDC_GW and HU_ENTRYNAV2), HU_ENTRYNAV2 depends on tl_1, and tl_11, and the BDC_GW has no Dependencies.
Now that we have checked Dependencies are are sure we don't need to update anything else, we can start the flashing process
The steps differ slightly depending on the OBD adapter you purchased and whether you have an iPhone/iPad or Android device, but i can give the basic outlines here:
MEGA DISCLAIMER: DO NOT ATTEMPT THIS WHATSOEVER IF YOUR CAR IS NOT ON AN I-LEVEL AT 21-03 OR HIGHER, YOU WILL DAMAGE YOUR HEADUNIT, I WILL NOT BE RESPONSIBLE FOR ANY DAMAGES CAUSED.
To Get Started, go into the Headunit, We will be going into expert mode for this, BE VERY CAREFUL, press on the Expert Mode toggle, Read the warning, and press OK. press on the Search button, and search for HMI_ID_VERSION, click on that option, and select id6_light, and save.
DO NOT CHOOSE ID6!, Choosing ID6 will essentially brick your headunit as it will now look for the actual ID6 files, and not just the ID6 theme for ID5 (which is what ID6_Light is, its essentially the ID6 look and feel, but using ID5 as a base) next, to get access to the "themes" that ID6 adds, we need to go back to our search box, and search for HMI_MAIN_MENU_VERSION, go into that, select Modern, and save. then we can press code.
Now Bimmercode will code in the new parameters to the headunit, restart it and clear any error codes, and if all goes well, you will now have the IDrive 6 look and feel on your (in my opinion better looking, Physical buttons are the best.) IDrive 5 headunit, Enjoy!
If you Ever want to go back, Bimmercode will have a backup of the original settings, if this is the first time accessing the headunit, meaning you can restore back to factory defaults should you want to, if you have customisations already, then in Expert mode, Revert "HMI_MAIN_MENU_VERSION" and "HMI_ID_VERSION" back to what they were before, these are:
